Wednesday, March 2, 2016

Photography

Photography is an important art form because people take pictures everyday  It is very important to teach your students about the different techniques to taking pictures!  With this, students can improve the quality of their pictures and also put more thought into how they take their pictures for now on.  Here are the four photography techniques:

Disturbance
  • The frame is disturbed because of something in the photo that is out off along the edge of the rectangle.
  • "A frame inside a frame"


  Promixity

  • The distance between the camera and the subject
  • Getting up close and personal!

Vantage Point
  • Refers to where you are
  • Below, above, outside, inside
  • anywhere other than your eye level\


Place
  • A clue of where you took the picture
  • The background


It's also important for your students to know and understand the compositional rules:

Rule of Thirds

Golden Spiral

Golden Triangle

To create a lesson out of this, your students could take pictures showing the composition methods and the photojournalism techniques around your school or have them take pictures of things meaningful to them incorporating the techniques!

Letter to Parent and Student


Dear Parents and Students,

Welcome to Miss Johnson's Art Class! 

 I am so glad your child decided to take this art class.  A little about myself:  I am a graduate from the University of South Carolina, where I graduated with a BFA in Art Education.  I am from Greenville, South Carolina.  I have been teaching at this school for ( ) years and I am excited to get to know your student as well as them getting to know me.

Art is a very vital subject that students need, along with their other subjects, in order to be successful.  When your child walks in my room, I want each and every one of them to feel like an artist!  At our school, we offer several different art classes, including Art 1, which includes drawing, 3D, color theory, etc, along with Ceramics, and Media Arts, and AP art for the gifted and talented that they can receive college credit for!

Throughout the school year, their will be many opportunities for your student to display and show off their art work, including the annual art show that is hosted by our school.  We also have NAHS, National Art Honor Society, an organization your student can join if they want to continue with art and display their art work in art shows around the state and nationally. 

I am looking forward to meeting you and your student and working with them so that they feel like artists!  I also want to thank you supporting your child throughout their art experience!  If you have any questions or concerns, do not hesitate to call or email me.

Thank you!

Sydney Johnson
Room 003
XXX-XXX-XXXX
sydneyjj@email.sc.edu

Color Theory

This is my favorite lesson!  For this lesson, students must first learn and understand the basic colors that you can mix to make other colors.  Primary colors are red, yellow and blue.  The secondary colors are orange, green and purple and these are created by mixing the primary colors..  The tertiary colors are formed by mixing the primary colors with the secondary colors and these are yellow-orange, red-orange, red-purple, blue-purple, blue-green and yellow-green.

The students will first create a color wheel demonstrating their understanding of correctly mixing colors.

Once they understand how to mix the colors, they will then be taught how to shade and tint these colors with an achromatic scale
and a monochromatic scale.

For their project, they will demonstrate their understanding of color theory with shades and tints in creating a monochromatic self portrait!  I will take photos of each student and using Photoshop, change the photo into black and white so that they can see the different tints and shades of their picture.  We will then grid the picture on 1":1" ratio.  They will draw their picture on a larger piece of paper on a 2":2" ratio.


Here are also some examples of my classmates!


This is a really fun and cool lesson that your students will love!


Colored Pencil Shading

Shading with colored pencils is much more difficult and takes longer to do than shading with regular drawing pencils.  To start this out, I would provide worksheets to my students so they can practice blending .  They would do this with the basic colors of the rainbow, going in order starting with red, and blend each color to the next, after i demonstrate on how to do this.

They would also practice blending on these worksheets, as you see above\ with the circles, where they will pick a color for each circle and blend on top with a different colors to see how certain colors work together and what colors don't.

For their project, I would bring in fruit, either real or plastic, for them to use as a still like,and draw and shade it.  They will not be allowed to use a black colored pencils.  I will have these put away so the students wont have access to them.  This project is simple because the main focus is for your students to understand color pencil shading since this is a hard technique for some students.

Ceramics


Ceramics
Pinch Pots

Students will learn the basic vocabulary and methods to pot making using the pinching technique.  Students will create a spirit rattle made up of two pinch pots to show they understand the technique.  The lesson will teach students about their spirit animal if they didn't already know about theirs or what a spirit animal is. They will also be introduced to the different kinds of glazes and be able to glaze their pots to be placed in the kilm for firing.


Essential Question:
How do I effectively create a spirit rattle using technique and designs based on what I learned in class?

Key Concept: 
Knowing how to make a pinch pot using basic ceramic forming techniques.

Unit Objectives:

  • Produce a spirit rattle that demonstrates your understanding of how to correctly join together pinch pots
  • Design the rattle inspired by your spirit animal.


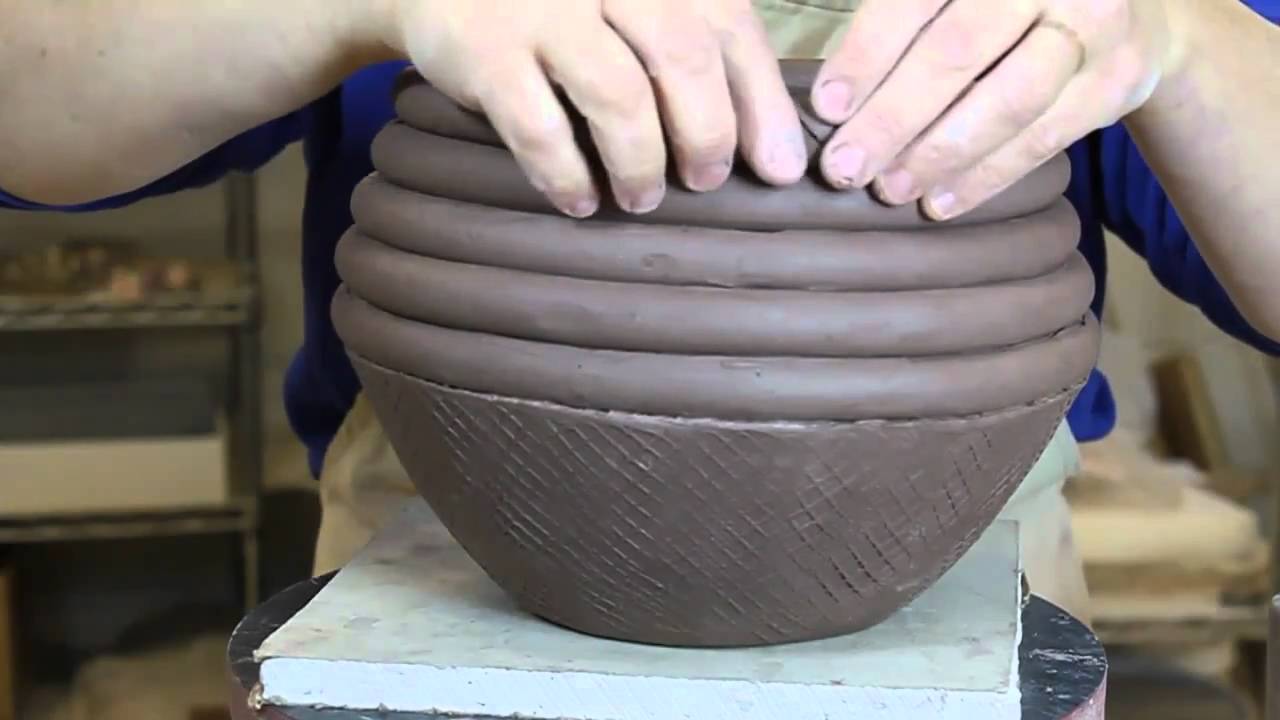
Coil Building

Students will learn how to build pots using the coil method.  They will also be incorporating some of the elements and principles of design like form, shape, line, balance, and color.  Once they've created their pots, they will then incorporate designs and textures into the pot and glaze them for firing.

Essential Question:
How do I effectively create a pot using the coil building method?
How does the level of craftsmanship effect the outcome of my coil pot?

Key Concept:
Knowing how to create a pot using basic coil building techniques.

Unit Objectives:
  • Produce a pot that demonstrates your understanding of using the coil building method that meets size requirements.
  • Incorporate texture and design on the exterior of the pot.

Friday, February 5, 2016

Tonal Layering

Today, we started trying to create our own lessons that we may want to teach to our future students. We looked through books provided to us by our professor that are tied to the different elements and principles of design.  In Creative Colored Pencil Workshop by Carlynne Hershberger and Kelli Money Huff, I found a great lesson on Tonal Layering using colored pencils (Prisma colored pencils are the best to use).

Tonal layering is the method of applying colored pencils in multiple light layers to build color.  You're basically creating a smooth area of color without visible pencil strokes.  There are four steps in creating this technique:
1. Draw, then apply the first layer.
2. Add more color and begin modeling.
3. Deepen the colors.
4. Add the dark values.
 Here is my example that I created for my students to see.  I didn't use Prisma colors, just regular colored pencils because that's what I had available at the time.  Depending on the school's budget, you could get Prisma colored pencils for all your students.  If not, they may have to use regular colored pencils, which is fine, because they'll still get the concept.

This would tie to the elements of value and texture, along with the principle of unity because the goal is to unify the piece adding layers of colors so that the pencil lines aren't showing.  

Before I do this lesson with my students, we would research on artists that include tonal layering in their work.  Artist like Robert Sloan and Linda MaCauley are good examples because they incorporate tonal layering with different mediums, such as oil pastels and watercolors.


Pink Clematis sketch in tonal layers in Niji oil pastel on paper.Second stage of Clematis tonal sketch, with layers of new colors added.
Above is a work of art by Robert Sloan.


Still Life Drawings

Today we will be talking about Still Life Drawing.  The first thing you need to know before starting is information about the drawing pencils.  Certain pencils draw certain shades.


Above are the different shades each different pencil makes.  "H" is considered the middle or the basic pencil.  It's best to use drawing pencils versus just a regular No. 2 pencil so you can get the correct shades that you want for whatever still life you're drawing and they're cool, so yeah!

First, we practiced creating value with some shading exercises like the ones above.


Now for the drawing!  We could either use a still life that our professor brought in, or bring our own (which i did).  We created three thumbnail sketches with different compositional arrangements on Newprint paper, then transferred one of the sketches to our real nice paper called Stonehenge.  We then turned the lights off and flashed a light over our still life to take a picture of the value differences, so that we would be able to add value to our drawing.  Once we drew the contour of it, we followed our pictures and added value to the drawing.  As you can see, I wasn't able to get too far with mine in the class session but here's how it looks so far.  I do plan on finishing it.


Here are some other examples from some high school students and some of my classmates.


The biggest problem for me is adding the value.  I'm more of a contour drawer, so the value part was where i struggled and I'm sure this will be a problem for a lot of students, whether it's them not knowing how to shade the drawing, or just being too lazy to do it.  What i have to do in order to be able to add value is start shading in sections from right to left.  With my students, i would just encourage them to do the same and also not to rush it.  Take their time with each section, if that means covering up the sections they aren't working on and go about it that way.